IR Sensor Interfacing With Arduino, Blynk, Bluetooth
An IR sensor is an electronic sensor commonly used to detect surrounding activity by emitting or detecting infrared radiation. According to physics, every object radiates an electromagnetic wave and this type of radiation is known as thermal radiation. So the wavelength of radiation depends on the temperature of the objects. The IR sensor detects this radiation and responds according to programming logic.
We can do a simple interface of IR sensor with Arduino but in this article, we will learn how to control IR sensor using the blynk android app because sometimes we need to control hardware remotely or collect data online. Or need to constantly check the state of the hardware. So let’s get started without any further ado.
Components Required:
Hardware Required:
- Arduino UNO and Cell-Phone
- OTG Cable
- Arduino Cable
- IR Sensor
- Bluetooth HC-05 Module
- Jumper Wires
Software Required:
- Arduino-Droid App in Cell-Phone
- Blynk App in Cell-Phone
Circuit Diagram And Connections:
Arduino and Bluetooth module pin configuration will be like the given table.
| Arduino | Bluetooth Module |
|---|---|
| Digital Pin 10 | Tx |
| Digital Pin 11 | Rx |
| 3.3V | Vcc |
| GND | GND |
Arduino and IR Sensor module pin configuration will be like the given table.
| Arduino | IR Sensor |
|---|---|
| 5V | Vcc |
| GND | GND |
| Digital Pin 2 | Output |
Steps to Follow:
01. Make the Circuit-Connections as shown above.
02. Open Arduino Droid App.
03. Paste the Code written in the Code-Section.
04. First Compile (try to remove comments if you get an error) and then Upload the code to Arduino.
05. Now open Blynk App.
06. Open Widget Box in Blynk App by touching (+) icon in the Upper-Right Corner.
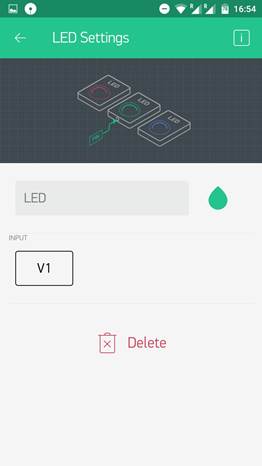
07. Now choose LED by clicking on it and set the Virtual Pin V1.
08. Now similarly choose Bluetooth Button.
09. The Blynk App Will Look like this.
10. Click the Play Button and now you can read your IR Sensor status in the Blynk App.
CODE
#define BLYNK_PRINT Serial
#include <SoftwareSerial.h>
SoftwareSerial SwSerial(10, 11); // RX, TX
#include <BlynkSimpleSerialBLE.h>
#include <SoftwareSerial.h>
int B;
// You should get Auth Token in the Blynk App.
// Go to the Project Settings (nut icon).
char auth[] = "b85eaead8f2536feb69a646e35286f35"; // (Your Auth.Code)
SoftwareSerial SerialBLE(10, 11); // RX, TX
BlynkTimer timer;
// This function sends Arduino's up time every second to Virtual Pin (5).
// In the app, Widget's reading frequency should be set to PUSH. This means
// that you define how often to send data to Blynk App.
WidgetLED led1(V1);
void myTimerEvent()
{
// You can send any value at any time.
// Please don't send more that 10 values per second.
Serial.print("Reading:");
if (B==HIGH) {
led1.on();
}
else
{
led1.off();}
}
 void setup()
{
// Debug console
Serial.begin(9600);
 pinMode(3,INPUT);
SerialBLE.begin(9600);
Blynk.begin(SerialBLE, auth);
 Serial.println("Waiting for connections...");
 // Setup a function to be called every second
timer.setInterval(100L, myTimerEvent);
}
void loop()
{
Blynk.run();
timer.run(); // Initiates BlynkTimer
B=digitalRead(3);
}
Similar Challenges
- Burglar Alarm using IR Sensor
- Automatic Tap Water Dispenser
- Automatic Head-Counter


