PIR Sensor Interfacing with Arduino
Components Required:
A) 1 Arduino UNO
B) Computer with Arduino IDE
C) USB to Arduino connecting Cable
D) Jumper Wires
E) PIR Sensor
Description:
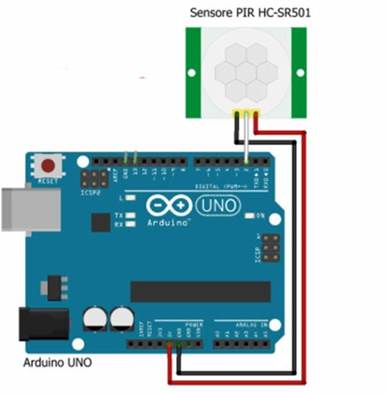
Here, we learn how to interface a PIR Sensor with an Arduino
Circuit Diagram:
Steps To Follow::
A) Establish the Circuit Mentioned.
B) Open Arduino IDE.
C) Click on File.
D) Go to New. – A new File will open
E) Remove the Pre-Written code..
F) Paste the code given in the “CODE Section”
G) Check whether your UNO has been detected by the ID by going to Tools.
H) Click on Port – Select the COM-Port on which Arduino UNO is detected.
I) Verify the Sketch by Clicking on the TICK icon.
J) Once, the sketch is verified, Upload the sketch using the ARROW icon.
Code:
int sensor=7; //The output of PIR sensor connected to pin 7
int sensor_value; //variable to hold read sensor value

void setup()
{
  pinMode(sensor,INPUT); // configuring pin 7 as Input
  Serial.begin(9600); // To show output value of sensor in serial monitor
}

void loop()
{
  sensor_value=digitalRead(sensor); // Reading sensor value from pin 7
  Serial.println(sensor_value); // Printing output to serial monitor
}
